The definitive guide to understanding, fixing, and preventing paper jams. Learn the secret techniques repair techs use to clear even the most stubborn jams, plus the 13 root causes behind why printers jam and how to eliminate them permanently.
Paper Jam? How to Clear It in 30 Seconds (And Stop It From Happening Again)
You're printing something important. The deadline is in 10 minutes. Suddenly, your printer makes that horrible grinding noise, flashes angry red lights, and displays the two words that strike fear into every office worker's heart:
PAPER JAM
You open the printer. You see the crumpled corner of paper mocking you from deep inside the machine. You pull it. It tears. Now you have the same problem plus dozens of tiny paper shreds scattered throughout the printer's internal organs.
Congratulations. Your 30-second print job just became a 30-minute nightmare.
Paper jams are the third most-searched printer problem on Google, and they're universally despised because they always seem to happen at the worst possible moment. I've been a printer repair technician for 14 years, and I've cleared thousands of paper jams. I've seen people cry, curse, and threaten to throw their printers out windows (please don't—the environmental impact is terrible).
But here's what most people don't know: 90% of paper jams are preventable, and once you understand the right technique, you can clear even the worst jams in under a minute without damaging your printer.
This guide will teach you everything I've learned from clearing jams professionally. You'll learn how to safely clear any jam, why your printer keeps jamming in the first place, and most importantly, how to make paper jams a thing of the past.
The 30-Second Paper Jam Clearing Technique (The Right Way)
Before we dive into causes and prevention, let's get your current jam cleared. Here's the technique repair techs use:
Step 1: Don't Panic and Don't Yank (2 seconds)
What most people do wrong: Grab the visible paper and pull as hard as possible.
Why this fails: Paper tears, leaving dozens of small pieces inside that cause repeated jams. Torn paper gets stuck around rollers, triggers sensors, and creates a bigger mess.
What to do instead: Take a breath. Resist the urge to yank. A calm, methodical approach clears jams faster and prevents damage.
Step 2: Power Down Completely (3 seconds)
The correct procedure:
- Press the power button to turn off the printer
- Wait for all sounds and lights to stop
- Unplug the power cable from the back of the printer
Why this matters:
- Safety first—moving parts can pinch fingers
- Laser printers have fusers that get HOT (200°C/390°F)—serious burn risk
- Prevents electrical shock when reaching inside
- Allows parts to cool before handling
For laser printers specifically: Wait 10-15 minutes after unplugging before reaching inside. The fuser unit stays dangerously hot for several minutes.
Step 3: Find Every Access Point (5 seconds)
Open ALL of these:
- Front cover/door
- Rear access panel (THIS is where most people forget)
- Top cover/scanner bed (if applicable)
- Paper output tray
- Paper input tray (remove it completely)
- Any side panels
Pro tip: Use your phone's flashlight to look inside from multiple angles. You'd be amazed how much stuck paper becomes visible when properly lit.
Step 4: Locate the Entire Jam (5 seconds)
What to look for:
- The bulk of the jammed paper
- Small torn pieces around rollers
- Paper stuck in the feed path
- Crumpled corners wedged in corners
Critical insight: There's usually MORE paper stuck than you can see initially. That corner you can see is connected to a whole sheet folded accordion-style deeper inside.
The cardinal rule: Pull paper in the direction it was traveling, never backwards.
How to determine direction:
- If paper is stuck entering the printer → pull back toward the input tray
- If paper made it past the rollers → pull forward toward the output tray
- When in doubt, pull toward the REAR panel (most printers feed front to back)
Step 5: Remove Paper Using the Two-Hand Technique (10 seconds)
The professional method:
- Find both edges of the stuck paper
- Grip firmly with both hands, holding the paper at two points
- Pull slowly and steadily (not jerking) in the correct direction
- Apply even tension across the whole sheet
- If you feel resistance, STOP—you're about to tear it
If paper tears despite your care:
- Don't panic
- Use tweezers or needle-nose pliers to grab small pieces
- Rotate the rollers manually to expose hidden bits
- Check around the rollers especially—that's where fragments hide
Advanced technique for stubborn jams:
- Manually rotate the rubber roller wheels
- This moves the paper along its intended path
- Look for a manual feed dial or just turn the roller by hand
- Some printers have a manual paper advance button (check your model)
Step 6: The Inspection Phase (5 seconds)
After removing visible paper:
Visual inspection with flashlight:
- Look along the entire paper path
- Check rollers from multiple angles
- Look for tiny paper fragments
- Check sensors (small plastic tabs)
Run your finger along the paper path:
- Feel for rough edges (torn paper sticks)
- Check between rollers
- Look inside the toner/ink cartridge area
Common hiding spots for paper fragments:
- Wrapped around roller wheels
- Stuck in the fuser unit (laser printers)
- Behind the toner cartridge
- In the output tray mechanism
- Behind the rear access panel
- In the duplex unit (double-sided printing module)
The mistake everyone makes: Clearing the visible paper and assuming you're done. Those tiny bits cause repeated "phantom" jams.
Step 7: Reassemble and Test (5 seconds + test print)
Reassembly checklist:
- Replace all removed trays and cartridges
- Close all access panels and doors FIRMLY (push until they click)
- Plug power cable back in
- Power on the printer
- Wait for complete initialization
The test print:
- Print a simple test page (not your important 50-page document)
- If it prints successfully, clear any error messages
- Try one more test page to confirm
If it jams again immediately: You missed a piece of paper. Go back to Step 3 and search more carefully.
Total time if done correctly: 30-60 seconds (not counting laser printer cool-down time)
Now that you've cleared your current jam, let's make sure it never happens again.
The 13 Hidden Causes of Paper Jams (And How to Fix Each One)
Cause 1: Wrong Paper Type or Size
Why this causes jams: Printers are designed for specific paper weights and sizes. Too thick, too thin, too rough, too smooth—all cause feeding problems.
Signs this is your problem:
- Jams happen with certain paper but not others
- New paper type recently started
- Using specialty paper (cardstock, labels, glossy)
The fix:
- Check your printer manual for supported paper specifications
- Most printers handle 20-24 lb (75-90 gsm) paper best
- Cardstock over 110 lb usually causes jams in consumer printers
- Labels must be specifically rated for laser or inkjet (they're different)
- Photo paper should only go through the manual feed slot
What repair techs recommend:
- Stick with major brands: HP, Georgia-Pacific, Hammermermill
- Avoid ultra-cheap bulk paper (it's inconsistent)
- Don't use paper thinner than 18 lb or thicker than 28 lb unless your printer specifically supports it
Brand compatibility:
- HP printers: Use 20-24 lb plain paper, 75-90 gsm
- Canon: Similar to HP, works well with standard office paper
- Epson: More forgiving, handles 17-24 lb
- Brother: Stick to 20 lb, less tolerant of variations
Cause 2: Overfilled Paper Tray
Why this causes jams: Too much paper creates pressure that makes sheets stick together. The rollers grab multiple sheets, causing a jam.
Signs this is your problem:
- Multiple sheets feeding at once
- Jams happen when tray is full, not when it's half-empty
- Paper fans out in the output tray
The fix:
- Never exceed the maximum fill line (usually marked inside the tray)
- The rule: Most trays hold 100-250 sheets depending on model
- Fill to only 80% capacity for best results
- Tap the stack on a flat surface to align edges before loading
Pro tip from repair techs:
- If you need to load maximum paper, fan the stack first
- Remove 10 sheets, flex them back and forth, then reload
- This separates sheets and reduces static cling
Cause 3: Paper Loaded Incorrectly
Why this causes jams: Paper guides too loose or too tight, paper facing wrong direction, or edges not aligned all cause feed problems.
Signs this is your problem:
- Paper feeds at an angle
- Only one edge of paper gets grabbed
- Consistent jams at the same point
The fix:
-
Remove all paper from the tray
-
Fan the paper (hold one edge and riffle the other like a deck of cards)
-
Tap the stack on the desk to align all edges perfectly
-
Load paper correctly:
-
For most printers: print side DOWN in the input tray
-
For manual feed: print side UP
-
Check your specific model (look for a diagram on the tray)
Adjust paper guides:
- Slide guides to match paper size
- Guides should be snug but not tight
- Paper should move slightly but not slide around
- If guides are too tight, paper buckles and jams
Insert tray completely until it clicks
Common mistake: Mixing paper sizes in the same tray. Keep letter, legal, and A4 separate.
Cause 4: Old, Damp, or Damaged Paper
Why this causes jams: Paper absorbs moisture from air, causing it to curl, warp, or stick together. Old paper loses its crisp edges and feeds poorly.
Signs this is your problem:
- Paper has visible curl or wave
- Edges look frayed or fuzzy
- Paper has been sitting for months
- Humid environment
- Paper feels damp or limp
The fix:
Replace old paper—if it's been sitting more than 6 months in the tray, start fresh
Proper storage:
- Keep paper in original wrapper until use
- Store in a cool, dry place (not basement, garage, or humid areas)
- Ideal conditions: 20-24°C (68-75°F), 45-55% humidity
- Keep paper flat, not on edge
- Store away from windows and exterior walls
Before loading:
- Let paper acclimate to room temperature for 24 hours if stored in different environment
- Check for curled edges (if curled, don't use it)
- Feel the paper—should be crisp and dry, not limp
Quick fix for slightly curled paper:
- Flex the stack backward (opposite the curl)
- This doesn't work for severely warped paper
Prevention: Buy paper in quantities you'll use within 3-6 months, not bulk boxes that sit for years.
Cause 5: Dirty or Worn Rollers
Why this causes jams: Rollers grab and feed paper. When dirty or worn smooth, they slip instead of grip, causing misfeeds and jams.
Signs this is your problem:
- Printer makes feeding sounds but paper doesn't move
- Multiple jams per day
- Roller wheels look shiny or feel slippery
- Visible dust or paper residue on rollers
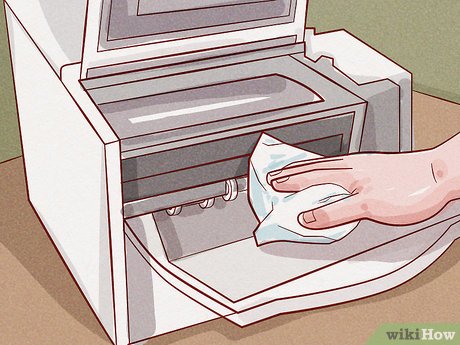
The fix:
For accessible rollers (front/rear access):
- Power off and unplug printer
- Open access panel to expose rollers
- Dampen a lint-free cloth with distilled water (not soaking wet)
- Wipe each roller wheel while rotating it
- For stubborn buildup, use isopropyl alcohol (90%+)
- Let dry completely (5-10 minutes) before powering on
Cleaning frequency:
- Light use: every 3 months
- Moderate use: monthly
- Heavy use (office): every 2 weeks
When to replace rollers:
- Rubber feels hard instead of slightly soft
- Rollers are shiny/smooth instead of slightly textured
- Visible cracks or chunks missing
- Cleaning doesn't improve feed reliability
Replacement cost: Roller kits typically cost $15-50 depending on model, and installation is usually DIY-friendly.
Quick test for roller wear: Print 20 sheets continuously. If 3+ jam, rollers are likely worn.
Cause 6: Foreign Objects Inside Printer
Why this causes jams: Paperclips, staples, torn paper bits, or even insects can block the paper path.
Signs this is your problem:
- Sudden jams after working fine
- Jams in the same spot repeatedly
- Hear rattling when printer moves
- Visible debris when you look inside
The fix:
- Power off and unplug
- Open all access panels
Use a flashlight and look for:
- Paperclips or staples
- Torn paper fragments wrapped around rollers
- Pen caps (yes, really)
- Dust bunnies in corners
- Small screws or plastic bits (from repairs or assembly)
Removal tools:
- Tweezers for small objects
- Needle-nose pliers for staples
- Compressed air for dust (hold can upright, short bursts)
- Soft brush for corners
Check these specific areas:
- Behind cartridges
- In the paper feed channel
- Around all roller wheels
- In the output tray mechanism
Prevention:
- Remove staples before printing
- Keep printer covered when not in use
- Don't place printer near open windows (dust and insects)
- Monthly cleaning with compressed air
Cause 7: Incorrect Printer Settings
Why this causes jams: If software settings don't match actual paper loaded, the printer feeds incorrectly.
Signs this is your problem:
- Computer set to Legal but you loaded Letter
- Document is larger than paper size
- Duplex (double-sided) settings causing issues
The fix:
Verify paper size settings:
- Open print dialog
- Check "Paper Size" dropdown
- Ensure it matches what's actually in the tray
- Common mistake: document set to A4, but Letter is loaded (different sizes)
Check print quality settings:
- "Best" or "High Quality" modes use more ink and slower feeding
- For plain paper, use "Normal" or "Draft" quality
- High quality on plain paper can cause smudging that jams
Duplex printing issues:
- Some papers are too thin for duplex
- Disable duplex if jams happen during page flipping
- Manual duplex is more reliable than automatic
Update printer driver:
- Old drivers may have bugs causing feeding issues
- Download latest from manufacturer's website
Pro tip: Create custom paper size profiles if you regularly use non-standard sizes.
Cause 8: Paper Feed Sensors Malfunction
Why this causes jams: Sensors detect paper position. If dirty or broken, they give false jam warnings or cause actual jams.
Signs this is your problem:
- "Paper jam" error but no paper inside
- Printer reports jam in wrong location
- Jam errors persist after clearing completely
The fix:
Locate sensors:
- Small plastic tabs or levers along paper path
- Usually white or transparent plastic
- Often have a tiny spring
Clean sensors:
- Power off printer
- Gently move sensors back and forth
- Use compressed air to blow away dust
- Wipe with lint-free cloth
Test sensor movement:
- Sensors should move freely and spring back
- If stuck or sluggish, may need replacement
Reset printer:
- Sometimes sensor calibration gets corrupted
- Full power cycle (unplug for 60 seconds) can reset
When to call a tech: If sensors are physically broken or electronic sensor readings are wrong after cleaning.
Cause 9: Worn or Damaged Separation Pad
Why this causes jams: The separation pad works with rollers to ensure only one sheet feeds at a time. When worn, multiple sheets feed together.
Signs this is your problem:
- Two or more sheets feed together
- Consistent jams with new paper and clean rollers
- Pad looks smooth or has visible wear
The fix:
Locate separation pad:
- Usually under the paper tray
- Remove tray and look at the bottom of the feed area
- Looks like a small rectangular rubber pad
Check for wear:
- Should feel slightly rough/textured
- If smooth and shiny, it's worn out
- Visible grooves or cracks = needs replacement
Clean first (may extend life):
- Wipe with damp cloth
- Use isopropyl alcohol for sticky residue
- Let dry completely
Replacement:
- Separation pads cost $5-20
- Usually simple to replace (search "your printer model separation pad replacement")
- Most snap in and out without tools
Replacement frequency: Every 50,000 pages or 2-3 years for office use, longer for home use.
Cause 10: Duplex Unit Problems (Double-Sided Printing)
Why this causes jams: Duplex units flip paper to print both sides. Additional complexity means additional jam points.
Signs this is your problem:
- Jams only happen during duplex printing
- Paper jams after printing first side, during flip
- Single-sided printing works fine
The fix:
Use appropriate paper for duplex:
- Minimum 20 lb paper (thinner tears during flip)
- Maximum 28 lb paper (thicker jams during flip)
- Avoid textured or rough paper
Reduce duplex print load:
- Don't print 100 duplex pages at once
- Limit to 20-30 pages per job
- Give printer cool-down time between large jobs
Check duplex unit specifically:
- Many printers have removable duplex modules
- Remove it and check for stuck paper
- Clean duplex rollers separately
- Ensure unit is seated properly when reinstalled
Disable auto-duplex if problematic:
- Use manual duplex (print odd pages, flip stack, print even pages)
- Slower but more reliable for problem printers
Cause 11: Toner/Ink Cartridge Issues
Why this causes jams: Improperly installed cartridges, leaking toner, or cartridges blocking paper path can cause jams.
Signs this is your problem:
- Jams started after changing cartridge
- Toner smudges on jammed paper
- Cartridge is loose or not seated fully
The fix:
Remove and reinstall cartridge:
- Take cartridge out completely
- Check for shipping tape or protective covers (orange pull-tabs)
- Clean cartridge contacts with lint-free cloth
- Reinstall firmly until it clicks
Check for toner leaks:
- Loose toner powder causes paper to stick
- If you see powder, vacuum it with a toner vacuum (not regular vacuum)
- Clean all affected areas
- May need to replace leaking cartridge
Verify cartridge compatibility:
- Wrong cartridge model can physically block paper path
- Use exact model specified for your printer
- Some third-party cartridges are slightly larger
Cartridge seating issues:
- Ensure all clips and locks are engaged
- Check that cartridge is level and straight
- Close all covers completely
Cause 12: Software or Driver Conflicts
Why this causes jams: Corrupted print jobs, wrong drivers, or communication errors can cause printer to feed paper incorrectly.
Signs this is your problem:
- Jams only with certain documents or programs
- Print preview looks wrong
- Printer pauses mid-job then jams
The fix:
Update printer driver:
- Download latest from manufacturer's website
- Uninstall old driver first
- Install new driver
- Restart computer
Clear print spooler:
- Windows: Restart Print Spooler service
- Delete files in C:\Windows\System32\spool\PRINTERS
- Restart spooler
Print from different application:
- If Word document jams, save as PDF and print PDF
- Sometimes application formatting causes issues
Test with simple document:
- Print plain text test page
- If that works, problem is document-specific
Cause 13: Printer Age and Mechanical Wear
Why this causes jams: All mechanical parts wear out eventually.
Printers have a rated life span (duty cycle).
Signs this is your problem:
- Printer is 5+ years old
- Increasing frequency of jams despite all fixes
- Multiple replacement rollers haven't solved it
- Grinding or unusual noises
The reality check:
- Consumer printers ($50-300): 3-5 year lifespan
- Business printers ($500-2000): 5-10 year lifespan
- Duty cycle ratings: 5,000-50,000 pages per month depending on model
The decision:
- If repair costs exceed 50% of replacement cost → replace
- If printer is beyond rated duty cycle → replace
- If multiple mechanical failures → replace
When to repair vs. replace:
- Under 3 years old: usually worth repairing
- 3-5 years old: depends on repair cost
- Over 5 years old: usually replace
- Critical factor: cost of new roller kit vs. entire new printer
Brand-Specific Paper Jam Solutions
HP Printer Paper Jams
Most common HP jam cause: Separation pad wear
HP-specific fixes:
- Remove all trays and check underneath for jammed paper
- Open rear access door (easy to forget on HP models)
- HP printers often jam at fuser unit—check there specifically
- Use HP Print and Scan Doctor to diagnose
- HP LaserJet models: check pickup roller (front of paper tray area)
HP model quirks:
- DeskJet series: prone to rear paper path jams
- OfficeJet: check ADF (auto document feeder) separately
- LaserJet: wait for fuser to cool before clearing jams (very hot)
Canon Printer Paper Jams
Most common Canon jam cause: Rear paper path blockage
Canon-specific fixes:
- Always check rear access panel first
- Canon feed rollers wear faster—clean monthly
- For PIXMA series: manually rotate green dial inside to advance paper
- Check paper cassette is inserted correctly (Canon is picky about this)
Canon model quirks:
- PIXMA series: small rear tray jams frequently
- Maxify: ADF jams common with thin paper
- imageCLASS: duplex unit jams if paper too thick
Epson Printer Paper Jams
Most common Epson jam cause: Paper curl from humidity
Epson-specific fixes:
- Use extra-dry paper (Epson is sensitive to humidity)
- Rear paper tray on EcoTank models jams easily—check first
- Clean feed rollers every 500 pages
- Check paper size lever is set correctly
Epson model quirks:
- EcoTank: bottom feed tray jams more than rear
- WorkForce: paper guides must be exact or jams result
- Expression: photo paper MUST use rear specialty tray
Brother Printer Paper Jams
**Most common Brother jam cause: **Drum unit area
Brother-specific fixes:
- Open front cover and remove drum unit assembly
- Pull paper straight up and out
- Check toner/drum assembly is locked correctly
- Brother jams often leave small bits around drum—check carefully
Brother model quirks:
- HL series: jams frequently if drum unit not seated
- MFC series: ADF jams common—use document feeder carefully
- DCP series: duplex unit jams if paper too thick
The Ultimate Paper Jam Prevention Checklist
Daily (if you print daily):
- Check paper tray—refill before empty to prevent misfeeds
- Fan paper before loading
- Verify paper size matches printer settings
Weekly:
- Print a test page to keep rollers conditioned
- Quick visual check inside printer for debris
- Ensure paper is stored properly (flat, dry, wrapped)
Monthly:
- Clean accessible rollers
- Blow out dust with compressed air
- Check for worn or damaged parts
- Update printer firmware/drivers
Quarterly:
- Deep clean all rollers
- Replace paper in tray with fresh stock
- Check separation pad for wear
- Verify all covers close properly
Annually:
- Consider roller replacement if heavy use
- Review paper quality—switch brands if needed
- Professional service for business printers
- Evaluate if replacement needed based on age/usage
The Bottom Line
Paper jams are frustrating, but they're not random. There's always a reason, and that reason is almost always fixable.
The most common causes (in order of frequency):
- Wrong paper type/quality (25%)
- Worn or dirty rollers (20%)
- Overfilled or misaligned paper tray (20%)
- Old or damaged paper (15%)
- Foreign objects (10%)
- Everything else combined (10%)
The prevention trinity:
- Quality paper, properly stored
- Clean rollers, regularly maintained
- Proper loading, not overfilled
Follow these three rules, and paper jams will become a rare annoyance instead of a daily battle.
When jams do happen, remember the 30-second technique: power off, access all panels, find the entire jam, pull slowly in the correct direction, inspect thoroughly, and test.
Your printer might never be completely jam-free—they're mechanical devices with dozens of moving parts. But with the knowledge from this guide, you now have the skills to handle any jam quickly and prevent most of them from happening in the first place.
Now go forth and print with confidence. And when the inevitable jam occurs, you'll be ready.
Frequently asked questions
Why does my printer jam every single time I try to print?+
Consistent jams indicate a specific problem, not random bad luck. Most common causes: worn rollers (replace them), wrong paper type (check manual for specifications), paper loaded incorrectly (remove, fan, and reload properly), or foreign object stuck inside (open all panels and look with flashlight). Check each systematically until you find the culprit.
How do I clear a paper jam when I can't see any paper?+
This "phantom jam" happens when tiny paper fragments are stuck inside or sensors think paper is there when it isn't. Fix: Open every access panel (including rear door), use flashlight to search thoroughly, check around all rollers, clean paper sensors (small plastic tabs), run your finger along entire paper path to feel for rough spots, then do a full power cycle (unplug for 60 seconds). Still stuck? Run printer's cleaning cycle from maintenance menu.
Can pulling paper out wrong during a jam damage my printer?+
Yes. Pulling backward (against the paper path) can damage rollers, gears, and sensors. Always pull in the direction paper was traveling. If you feel strong resistance, stop—you're about to break something or tear the paper. Instead, open more panels to access the jam from a better angle or manually rotate rollers to release tension before pulling.
Why does my printer say "paper jam" but there's no paper stuck anywhere?+
False jam errors are caused by: tiny paper fragments triggering sensors (check thoroughly with flashlight), dirty or stuck paper sensors (clean and move them manually), misaligned covers sending wrong signals (close all doors firmly), or sensor calibration issue (try full reset by unplugging 60 seconds). Also check if something is blocking the paper path even though it's not paper (debris, broken plastic bit, etc.).
How often should I clean my printer rollers to prevent jams?+
Cleaning frequency depends on usage. Light home use: every 3 months. Moderate use: monthly. Heavy office use: every 2 weeks. Signs you need cleaning sooner: multiple jams per week, roller wheels look dirty or shiny, paper feeding sounds change, or sheets feeding at an angle. Clean with lint-free cloth slightly dampened with distilled water or 90%+ isopropyl alcohol.
Is it normal for paper to jam more as my printer gets older?+
Yes. Rollers wear smooth and lose grip over time. Separation pads deteriorate. Parts that align paper develop play in their movement. Consumer printers (under $300) typically last 3-5 years. Business printers can go 5-10 years with parts replacement. If your printer is 5+ years old and jamming frequently despite all fixes, replacing it is often more cost-effective than continued repairs.
What type of paper causes the fewest jams?+
Use 20-24 lb (75-90 gsm) plain white paper from major brands (HP, Georgia-Pacific, Hammermermill, Staples brand). Avoid ultra-cheap bulk paper (inconsistent quality causes jams), very thin paper under 18 lb (tears and crumples), very thick paper over 28 lb (most consumer printers can't handle it), textured or embossed paper (doesn't feed smoothly), or damp paper (curls and sticks).
Can humidity cause paper jams?+
Absolutely. Paper absorbs moisture from humid air, causing it to curl, warp, and stick together. This is especially problematic in coastal areas or during summer. Solutions: Store paper in original wrapper in climate-controlled space (not basement/garage), let paper acclimate to room temperature 24 hours before using, use dehumidifier in printer area if humidity regularly exceeds 60%, replace paper sitting in tray for weeks, and buy paper in smaller quantities that you'll use within 3-6 months.
Should I use cheap generic paper or name-brand paper?+
Quality matters more than brand, but name-brand paper is more consistent. Cheap bulk paper varies in thickness, has rougher edges, contains more dust, and often causes feed problems. The money you save gets spent on wasted time clearing jams, wasted paper from failures, and earlier printer replacement due to roller wear. For important documents, use name-brand. For drafts, mid-tier brands are fine. Avoid the absolute cheapest options—they're cheap for a reason.
Why does my printer jam only when printing double-sided (duplex)?+
Duplex printing is mechanically complex—paper must be flipped and re-fed. Common causes: Paper too thin (use minimum 20 lb for duplex), paper too thick (maximum 28 lb for most printers), duplex rollers dirty or worn (clean them specifically), or printer attempting to flip too many pages at once (limit duplex jobs to 20-30 pages). If persistent, disable auto-duplex and do manual duplex—print odd pages, flip stack, print even pages.