The most complete printer installation guide on the internet. Covers every method of installing any printer on Windows 11, Windows 10, and Mac—USB, WiFi, Ethernet, and network printers. Includes troubleshooting when installation fails.
How to Install a Printer on Windows 11? Complete Setup Guide (Every Brand)
You just bought a brand new printer. It's still in the box. The cables are tangled. There's a setup guide that looks like it was written by someone who never actually used a printer. And somewhere in there, a USB cable, a power cord, and a piece of paper that says "Quick Start" but takes 47 steps.
You plug it in. Nothing happens. You try downloading something from the website. The installer crashes. Now you're 45 minutes deep into a "simple" setup and your printer is just sitting there, judging you.
"How to install a printer" is one of the most-searched printer questions on Google. Every single day, millions of people unbox a brand new printer and have absolutely no idea how to get it working.
And honestly? It shouldn't be this hard.
I've been setting up printers professionally for 13 years.
I've installed over 4,000 printers across Windows, Mac, USB, WiFi, Bluetooth, and network connections.
I know every trick, every shortcut, and every problem that can go wrong during installation.
This guide is the ONLY installation resource you'll ever need.
Whether you have a brand new HP, Canon, Epson, or Brother printer—wired or wireless—this step-by-step guide will get it working in under 10 minutes.
No confusing manuals. No guessing. Just clear, simple steps that actually work.
Before You Start: What You Need (30 Seconds)
Before touching anything, gather these items:
Physical items:
- Your new printer (unboxed)
- Power cable (usually included in box)
- USB cable (included for wired setup, NOT needed for WiFi)
- Your WiFi password (written down—you'll need it for wireless setup)
On your computer:
- Know your operating system: Windows 11, Windows 10, or Mac
- Internet connection working
- Know your computer's password (needed for installations)
Find these on your printer:
- Model number (printed on front/top of printer—example: HP DeskJet 2700)
- Serial number (sticker on back/bottom—10-digit code)
Remove from printer:
- ALL packaging tape (inside AND outside)
- Plastic wrapping around every part
- Protective foam pieces
- Orange/blue protective clips on ink cartridges
- Cardboard pieces holding components in place
- The plastic sheet covering the display screen
Pro tip: Manufacturers tape/clip/wrap EVERYTHING. Spend 2 minutes removing all packaging before starting. Hidden packaging is the #1 reason new printers won't work.
Install Ink Cartridges First (Before Anything Else)
This step happens BEFORE plugging anything in.
For Inkjet Printers:
-
Open the ink cartridge access door (usually top or front)
-
Cartridge holder should move to center automatically when door opens
-
Remove cartridge packaging completely
CRITICAL: Remove ALL protective tape and orange pull-tabs from cartridge
-
Hold cartridge with copper/gold contacts facing down
-
Align cartridge with correct slot:
-
Black cartridge = usually LEFT slot
-
Color cartridge = usually RIGHT slot
-
Check inside printer for color-coded labels matching cartridges
-
Push cartridge firmly into slot until it CLICKS
-
Repeat for all cartridges
-
Close the access door completely
For Laser Printers:
- Open the front door/panel
- Remove toner cartridge from packaging
- CRITICAL: Pull the orange/yellow seal strip completely out (pull firmly until entire strip removed)
- Shake toner cartridge gently side-to-side (5-6 times) to distribute toner
- Slide cartridge into printer following the arrow guides
- Push in until it clicks and seats fully
- Close the front door completely
If ink/toner isn't installed: Printer won't work at all during setup. Install FIRST.
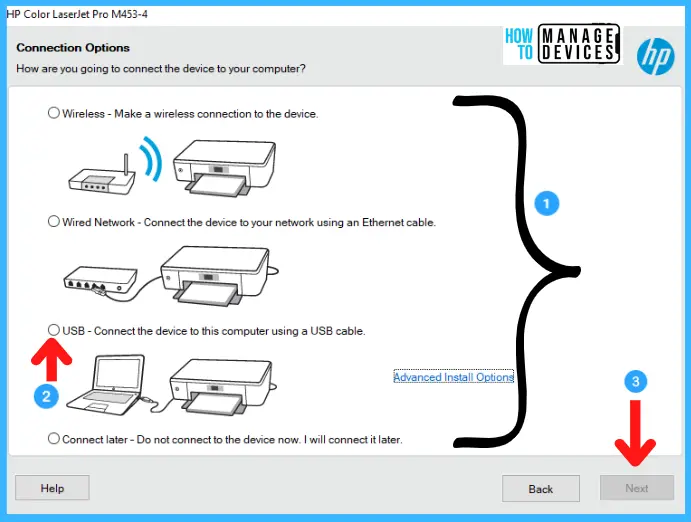
Method 1: How to Install a USB Printer (Wired Connection)
Best for: Simplest setup, most reliable connection, single computer
Time: 5-8 minutes
Step-by-Step:
Step 1: Position Your Printer
- Place printer on flat, stable surface
- Within 5 feet of your computer
- Near a power outlet
- Make sure USB cable can reach from printer to computer
Step 2: Connect Power Cable
- Plug power cable into back of printer
- Plug other end into wall outlet or power strip
- Make sure power strip is turned ON
- Press power button on printer
- Wait for printer to fully initialize (30-60 seconds)
- All lights should stop blinking and stabilize
Step 3: Connect USB Cable
- Take USB cable from box
- Plug the SQUARE end into the back of the printer (USB-B port)
- Plug the RECTANGULAR end into your computer (USB-A port)
- Make sure both ends click in firmly
- Avoid USB hubs—plug directly into computer
Step 4: Wait for Windows to Detect (Windows 11/10)
- Windows should automatically detect new printer
- You may see notification: "Setting up new device"
- Windows installs basic driver automatically
- Wait 1-2 minutes for installation to complete
- Check if printer appears in Settings → Printers
Step 5: Verify Installation
- Press Windows key + I (Settings)
- Click "Bluetooth & devices" (Windows 11) or "Devices" (Windows 10)
- Click "Printers & scanners"
- Your new printer should appear in the list
- If it appears → Installation successful!
Step 6: Print Test Page
- Click on your printer in the list
- Click "Printer properties" or "More options"
- Click "Print test page"
- Check that test page prints correctly
- If test page prints → You're done!
If Windows doesn't detect printer automatically:
Skip to "Installing Printer Driver Manually" section below
Method 2: How to Install a WiFi Wireless Printer
Best for: Printing from multiple devices, no cables, modern setup
Time: 8-12 minutes
You will need: Your WiFi network name and password
Option A: Using the Printer's Wireless Setup Wizard (Recommended)
Step 1: Power On Printer
Plug in power cable
Press power button
Wait for full initialization
Display should light up and show home screen
Method 2: How to Install a WiFi Wireless Printer
Best for: Printing from multiple devices, no cables, modern setup
Time: 8-12 minutes
You will need: Your WiFi network name and password
Option A: Using the Printer's Wireless Setup Wizard (Recommended)
Step 1: Power On Printer
- Plug in power cable
- Press power button
- Wait for full initialization
- Display should light up and show home screen
Step 2: Access WiFi Setup on Printer
HP Printers:
- Touchscreen: Tap WiFi icon → Wireless Setup Wizard
- Button printer: Press and hold WiFi button for 3 seconds
Canon Printers:
- Press WiFi button on printer
- Select "Wireless LAN Setup" → "Easy Setup"
Epson Printers:
- Press Home button → WiFi Setup icon → WiFi Setup Wizard
Brother Printers:
- Press Menu → Network → WLAN → Setup Wizard → Yes
Step 3: Select Your WiFi Network
-
Printer displays list of nearby WiFi networks
-
Find YOUR network name (the one your computer uses)
-
IMPORTANT: Select the 2.4GHz version (NOT 5GHz)
-
If two networks with same name exist, pick the one WITHOUT "5G" in the name
-
Tap/select your network
Step 4: Enter WiFi Password
- Printer asks for WiFi password
- Use on-screen keyboard or arrow keys to type password
- Password is CASE SENSITIVE—capitals matter
- Double-check before confirming
- Press Enter/OK/Connect
Step 5: Wait for Connection
- Printer connects to WiFi (10-30 seconds)
- WiFi light should turn solid (not blinking)
- Display should confirm "Connected" or show WiFi bars
- If failed → Check password and try again
Step 6: Install Printer on Your Computer
Windows 11:
- Press Windows key + I → Settings
- Bluetooth & devices → Printers & scanners
- Click "Add a printer or scanner"
- Wait for Windows to search
- Your new printer should appear in results
- Click on printer name → "Add device"
- Follow prompts to complete installation
Windows 10:
- Settings → Devices → Printers & scanners
- Click "Add a printer or scanner"
- Click on your printer when it appears
- Click "Add device"
- Follow installation prompts
If printer doesn't appear automatically:
- Click "The printer that I want isn't listed"
- Select "Add a printer using a TCP/IP address or hostname"
- Find printer's IP address (print network config page from printer)
- Enter IP address and follow prompts
Step 7: Print Test Page
- Click your printer in the list
- Printer properties → Print test page
- Confirm test page prints correctly
- Setup complete!
Option B: Using WPS Button (Fastest Method—30 Seconds)
Requirements: Router must have WPS button (usually on back)
- Press WPS button on your router
- Within 2 minutes, press WiFi button on printer for 3 seconds
- Wait 30 seconds
- Printer connects automatically—no password needed
- Install on computer using Step 6 above
Option C: Using Manufacturer's App (Easiest for Beginners)
-
HP: Download "HP Smart" app
-
Canon: Download "Canon PRINT" app
-
Epson: Download "Epson iPrint" app
-
Brother: Download "Brother iPrint&Scan" app
-
Download app on your phone or computer
-
Open app → "Add Printer" or "Setup New Printer"
-
App automatically finds your printer
-
Follow app instructions to connect to WiFi
-
App handles everything automatically
-
Test print from app to verify
Method 4: Installing Printer Driver Manually (When Auto-Install Fails)
When to use: Windows didn't automatically install printer, or printer isn't working after connection
Time: 5-10 minutes
Step-by-Step:
Step 1: Find Your Printer's Model Number
Look on front or top of printer
Example: HP DeskJet 2755, Canon PIXMA MG3620, Epson WorkForce WF-3620
Step 2: Download Driver from Manufacturer Website
HP:
- Go to support.hp.com
- Enter your printer model number
- Click "Software & Drivers"
- Select your operating system (Windows 11 64-bit, etc.)
- Download the FULL driver package (not just basic driver)
Canon:
- Go to usa.canon.com/support
- Search your printer model
- Click "Drivers"
- Select OS version
- Download driver
Epson:
- Go to epson.com/support
- Search model number
- Click "Drivers & Downloads"
- Download full driver/utility package
Brother:
- Go to support.brother.com
- Enter model number
- Click "Downloads"
- Select OS and download driver
Step 3: Run the Downloaded Installer
- Find downloaded file (usually in Downloads folder)
- Double-click to run installer
- Accept terms and conditions
- Choose "Express Install" or "Recommended"
- Connect printer when installer asks (if not already connected)
- Follow all on-screen prompts
- Click Install/Next at each step
- Wait for installation to complete (2-5 minutes)
- Restart computer when prompted
Step 4: Verify Installation
- After restart, check Printers & scanners
- Your printer should appear
- Print test page
- Installation complete!
How to Install Printer on Mac
Mac installation is usually simpler than Windows.
Method A: USB Connection (Mac)
- Connect USB cable from printer to Mac
- Power on printer
- Mac automatically detects and installs printer
- Check: System Settings → Printers & Scanners
- Printer should appear automatically
- Print test page to verify
Method B: WiFi Connection (Mac)
- Connect printer to WiFi using printer's setup wizard (see Method 2 above)
- On Mac: System Settings → Printers & Scanners
- Click "+" button to add printer
- Your printer should appear in the list
- Select printer and click "Add"
- Mac downloads and installs driver automatically
- Print test page
Method C: If Printer Doesn't Appear on Mac
- Download driver from manufacturer website
- Run installer on Mac
- Follow on-screen instructions
- Restart Mac
- Check Printers & Scanners again
Brand-Specific Installation Tips
Installing HP Printer
Fastest method: HP Smart App
- Download HP Smart from Microsoft Store or hp.com
- Open app → Add Printer
- App guides entire setup process automatically
- Works for both USB and WiFi
HP-specific tips:
- HP printers usually auto-install on Windows with basic driver
- For FULL features (scanning, fax), install complete driver from hp.com
- If HP Smart app won't install printer, try manual WiFi setup on printer first
- HP printers need WiFi connected BEFORE adding to computer
Installing Canon Printer
Fastest method: Canon PRINT app or setup CD (if included)
- Download Canon PRINT from app store
- Follow app setup instructions
- Connect to WiFi through app
Canon-specific tips:
- Canon often includes setup CD in box—use it if available
- Canon WiFi setup requires pressing WiFi button on printer first
- For scanning features, install Canon IJ Scan Utility separately
- Canon printers are picky about WiFi password—double-check capitals
Installing Epson Printer
Fastest method: Epson iPrint app
- Download Epson iPrint
- Open → Add Printer → Follow steps
- App handles WiFi and driver installation
Epson-specific tips:
- Epson usually includes setup CD—use it for complete installation
- Epson Connect setup required for cloud printing features
- Download Epson Event Manager for scan-to-computer
- WiFi setup on Epson requires navigating menu with arrow buttons
Installing Brother Printer
Fastest method: Brother iPrint&Scan app
- Download Brother iPrint&Scan
- Follow app setup wizard
- App connects printer to WiFi and installs drivers
Brother-specific tips:
- Brother WiFi setup uses arrow keys (not touchscreen on most models)
- Brother laser printers need toner seal removed before setup
- Install Brother ControlCenter for full scan/fax features
- Brother requires WiFi connected on printer BEFORE computer setup
Troubleshooting: When Installation Fails
Problem 1: "Printer Not Found" During Setup
Why it happens: Printer not connected, not powered on, or on different network
Fix:
- Verify printer is powered on (lights visible)
- Check cable connections are secure
- For WiFi: Verify printer connected to YOUR network
- Restart printer, computer, and router
- Try adding printer manually using IP address
Problem 2: Driver Installation Fails or Crashes
Why it happens: Corrupted download, incompatible driver, or conflicting software
Fix:
- Re-download driver from manufacturer website
- Make sure you selected correct OS version (32-bit vs 64-bit matters)
- Temporarily disable antivirus during installation
- Close all other programs before running installer
- Run installer as Administrator (right-click → Run as Administrator)
- If still failing, try basic Windows driver instead of manufacturer driver
Problem 3: Printer Installs But Won't Print
Why it happens: Wrong driver installed, incomplete installation, or connection issue
Fix:
- Uninstall and reinstall driver completely
- Verify printer is set as default printer
- Check "Use Printer Offline" is unchecked
- Clear print spooler (Services → Print Spooler → Restart)
- Try printing test page from printer properties
Problem 4: Installation Works on One Computer But Not Another
Why it happens: Different OS version, missing driver, or network issue
Fix:
- Install driver on second computer from manufacturer website
- Make sure both computers are on same WiFi network
- Check printer is shared (if using shared printer setup)
- Verify second computer has same OS version driver installed
Problem 5: Printer Shows "Offline" After Installation
Why it happens: See our complete guide on fixing printer offline issues
Quick fix:
- Settings → Printers → Open print queue
- Printer menu → Uncheck "Use Printer Offline"
- Restart printer and computer
Problem 6: Scanner Won't Install or Work
Why it happens: Basic driver installed instead of full driver package
Fix:
- Uninstall current printer software completely
- Download FULL driver/utility package from manufacturer
- Not just "printer driver"—install the complete package
- Reinstall following all prompts
- Scanner features require full installation
Setting Your New Printer as Default
After installation, make your new printer the default:
Windows 11:
- Settings → Bluetooth & devices → Printers & scanners
- Click your new printer
- Click "Set as default"
- Turn OFF "Let Windows manage my default printer"
Windows 10:
- Settings → Devices → Printers & scanners
- Click printer → "Manage"
- Click "Set as default"
Mac:
- System Settings → Printers & Scanners
- Select your printer
- Set as default in dropdown menu
Quick Setup Checklist (Print This Out)
Before starting:
- Remove ALL packaging from printer
- Install ink/toner cartridges
- Remove protective tape from cartridges
- Know your WiFi password
- Know your printer model number
USB Setup:
- Connect power cable
- Power on printer
- Connect USB cable
- Wait for Windows to detect
- Print test page
WiFi Setup:
- Connect power cable and power on
- Run WiFi setup on printer
- Select 2.4GHz network
- Enter WiFi password
- Add printer on computer
- Print test page
After Setup:
- Set as default printer
- Print test page successfully
- Test scanning (if applicable)
- Bookmark this page for future reference
Frequently asked questions
How do I install a printer on Windows 11 without a CD?+
ou don't need a CD. Either: (1) Connect via USB and Windows 11 automatically detects and installs basic driver, or (2) Download the driver directly from manufacturer's website—search your printer model at support.hp.com, usa.canon.com/support, epson.com/support, or support.brother.com. Select your OS (Windows 11) and download the full driver package. Run the downloaded file and follow instructions.
Why isn't my new printer being detected by my computer?+
Check these in order: (1) Is printer powered on and fully initialized? (2) Is cable/WiFi connection secure? (3) For WiFi printers, is the printer connected to YOUR network (not a neighbor's)? (4) Try restarting printer, computer, and router. (5) For USB: try different USB port or cable. (6) Download and manually install driver from manufacturer's website.
Can I install a wireless printer without WiFi password?+
Yes, using WPS (WiFi Protected Setup). Press WPS button on your router, then press WiFi button on printer within 2 minutes. Printer connects automatically without password. Not all routers have WPS buttons—check back or side of router. If no WPS button, you'll need the WiFi password (found on router label or in router settings).
How do I install a printer that my computer doesn't recognize?+
Download the driver manually from the manufacturer's website. Go to their support page, search your exact printer model, select your operating system, and download the full driver package. Run the installer as Administrator (right-click file → Run as Administrator). Connect printer when installer asks. If still not recognized, try: different USB port, different cable, or restart computer after installation.
Do I need to install a driver for every printer?+
For basic printing, Windows 11 and 10 can automatically install generic drivers for most USB printers—no manual driver needed. However, for FULL features (scanning, fax, color management, special print modes), you need the manufacturer's complete driver package. Download from official support website for your exact printer model.
How do I install a printer on two computers?+
nstall on each computer separately. For USB: only one computer can use USB connection at a time. For WiFi: connect printer to WiFi once, then add it to each computer individually through Settings → Printers → Add printer. Both computers must be on the same WiFi network. Each computer needs the driver installed (either auto-install or manual download).
Why does my printer install but scanning doesn't work?+
Basic driver installation only enables printing. Scanning requires the FULL driver/utility package from manufacturer's website. Uninstall current software, download complete package (not just printer driver), and reinstall. Look for packages labeled "Full Feature Driver" or "Complete Driver & Utility." This includes scanning software, color management, and all additional features.
How long does printer installation take?+
USB installation: 2-5 minutes (mostly automatic). WiFi installation: 5-10 minutes (includes connecting to network). Manual driver installation: 5-10 minutes (download and run installer). If installation is taking longer than 15 minutes, something is wrong—restart and try again following this guide.
Can I install a printer without internet connection?+
For USB printers: Yes. Windows can install basic drivers without internet. For WiFi printers: No—you need internet for WiFi connection. For full features: You need internet to download complete drivers. If you have no internet, use the setup CD if included in the box, or download drivers beforehand on another device.